A beginner’s guide for OpenID Connect Authorization Code flow with Keycloak
List of Content
- Introduction to OpenID Connect (for OpenID learners)
- What are OpenID Connect Flows? (for OpenID learners)
- Detailed guide to the Authorization Code flow
- Authorization Code flow implementation
- Demonstration
If you are already familiar with OpenID Connect, you can skip section one & two
1. Introduction to OpenID Connect

I assume that you are already familiar with full stack applications. They have a frontend and a backend (most probably backed by a relational or NoSQL database).
When someone has to implement user authentication in such an application, this is what most of the developers typically do; They create a table or a collection in the database to keep user details including credentials, and then they create few backend APIs for user CRUD operations, and develop an authentication endpoint to verify username and password.
At the fronted, few screens including a login form will be developed to interact with the backend for user CRUD operations and authentication.
Above approach will work successfully for a certain time period (or forever for some applications if you are lucky). As time goes by, you will be forced to alter this implementation due to few reasons.
- Your manager may ask to connect your application with another application developed inside your organisation. Now both applications should be accessible through single sign on
Single sign on – Once logged in to a one application, users should be able to smoothly switch between each application using the same session – without having to re-login - Your customers are asking to login to your application using their corporate identity providers so once they logged into their system, they can directly access your application. (Eg: Login from Microsoft Account or Google workspace)
To cater above requests you will have to think in a different way. If we look carefully, we can understand that above both scenarios are related to the same concept.
It is about authentication delegation. That means user authentication process is handed over to another trusted party. This trusted party is called the identity provider or simply Idp.
When you are looking for a mechanism to delegate the authentication, this is where OpenID Connect comes to the support.
Side Note: OpenID Connect is not the only protocol used for authentication delegation. SAML protocol is also used heavily. In this post we will be talking only about OpenID Connect.
Now you might be wondering, how does OpenID Connect do this magic ?
The primary goal of the OpenID Connect protocol is to identify the signed-in user to your application with the help of a trusted third-party.
Once a user has signed in to your application via OIDC, your application will receive an access token and an ID token.
- ID token is used to identify the user and it contains details like first name, last name, email, and other profile information.
- Access token is used for accessing protected resources on behalf of the signed-in user.
OpenId Connect has different implementations to generate and provide tokens based on different scenarios (use cases). Those implementations are called flows.
2. OpenID Connect Flows
OpenId Connect defines several flows, each suited for different scenarios:
- Authorization Code Flow: Used for server-side applications. The client receives an authorization code, which is then exchanged for an access token and an id token. This approach is secure as the client does not handle user credentials directly. – We will be talking about this flow further in this post
- Implicit Flow: Used in client-side applications, typically single-page apps (though now discouraged due to security concerns). The client receives an access token directly. – PKCE flow is recommended as a replacement for implicit flow
- Client Credentials Flow: Used when the client itself is the resource owner, such as in machine-to-machine communication. No user is involved in this flow.
- Resource Owner Password Flow: Allows the client to obtain tokens using the user’s credentials. This grant type is less secure and generally only used in trusted environments.
3. Detailed Guide to the Authorization Code Flow
Below explanation will be more clarified when you go through the implementation of this flow under the section 4
As mentioned above, the authorization code flow is used for server-side applications, including those built with Spring Boot, Node.js, and PHP.
Flow is initiated when a user tries to login to the application by trying to access the login endpoint [1]. When a user hits the login endpoint through his user agent (web browser in most cases), he is redirected to the identity provider’s authorization endpoint through a browser redirection [2].
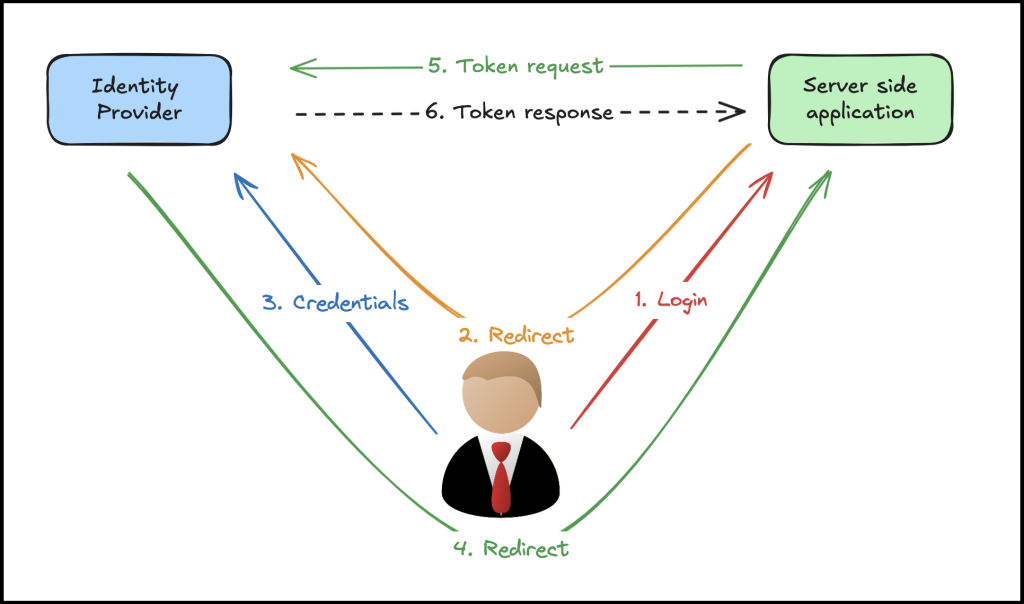
This browser redirection request contains a set of important parameters.
- client_id : identity of the client requesting the authentication
- redirect_uri : user should be redirected to this url after successful authentication
- response_type: what should be returned as the response after a successful authentication. response_type is set to ‘code’ in Authorization code flow.
- scope: parameter that defines the level of access or permissions that the client application is requesting from the authorization server. scope is set to openid in OpenID Connect requests.
Once the user is redirected to the identity provider’s authorization URL with the above mentioned parameters, it will check whether the user already has a valid session in the Idp.
If no valid session exists, identity provider will present a login form to the user and user will have to provide valid credentials [3] (username/ password), once authentication is done, then user will be redirected to the redirect_uri [4].
If there already exists a valid session, user will be redirected back to the redirect_uri [4] without asking to provide credentials.
This redirection request to the redirect_uri also has an important parameter. It is the authorization code. it can be found in a request parameter named ‘code’. Your backend should capture this code parameter and then it has to make another back channel request to the identity provider to retrieve the access token and id tokens [5].
This is a direct http call and no redirection involved. This request is made to the token url provided by the identity provider and contains below parameters
grant_type: which is ‘authorization_code’
client_id: id of the client
client_secret: secret of the client
code: code received from the redirection call.
redirect_uri: need to set the redirect uri again.
once this request is sent, Idp will provide access and id tokens as the response [6]. Using those tokens you can get logged in user’s details (via id token) and make external calls on behalf of that user using the access token.
4. Authorization Code Flow Implementation
Keycloak Configurations
I have a local instance of my Keycloak server running on https://localhost:8080. Admin console is accessible through any web browser using that URL.
Keycloak Client Configuration
Once visited the admin console, it is required to create a new client application. We have to visit the clients section for that.
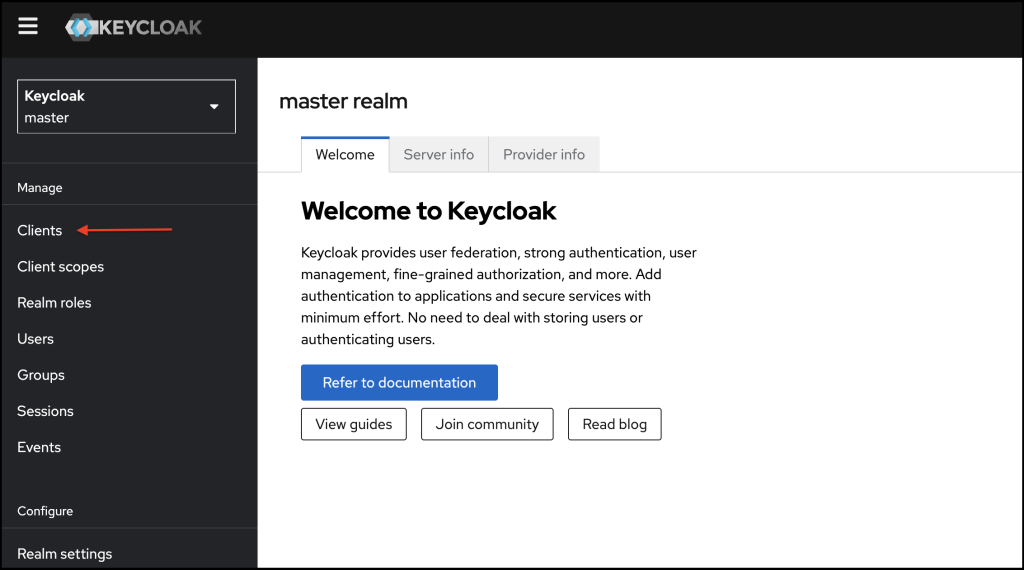
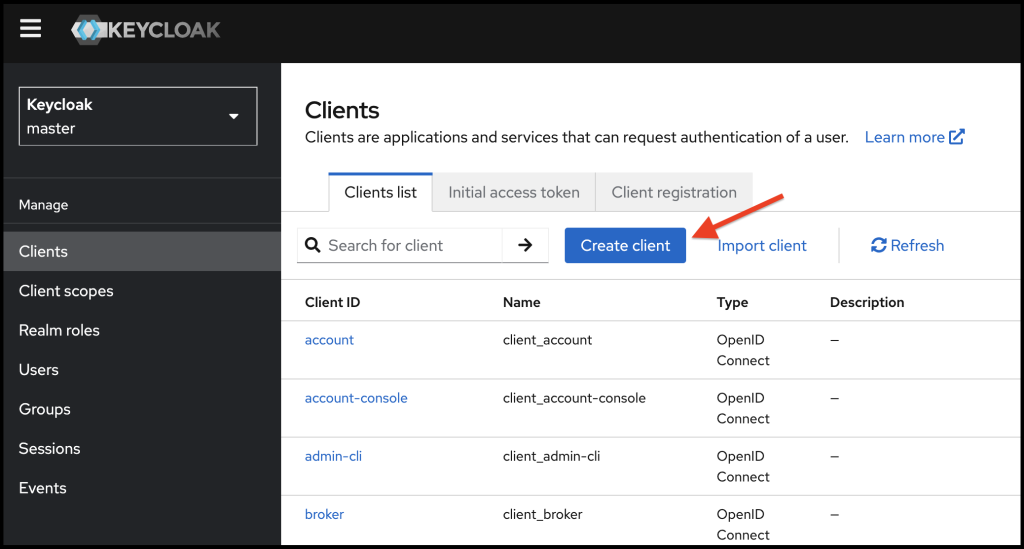
Once visited the clients page, click on create client.
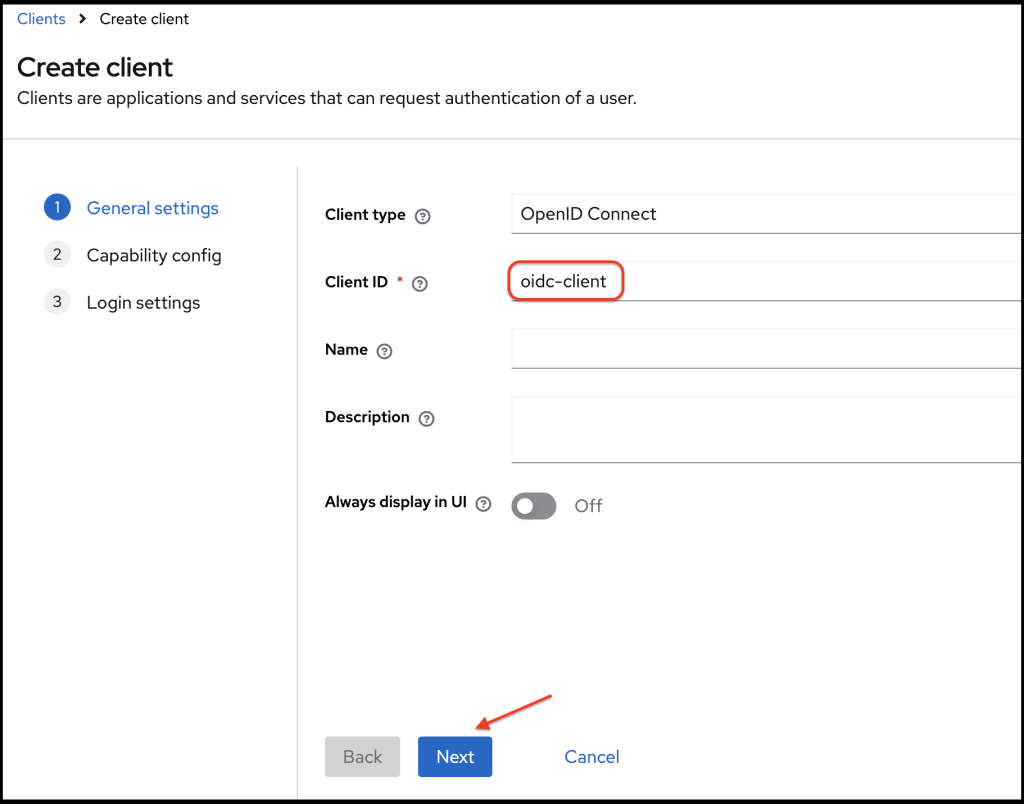
On the general settings form, we need to provide a valid client id. Here I have added the client id as oidc-client.
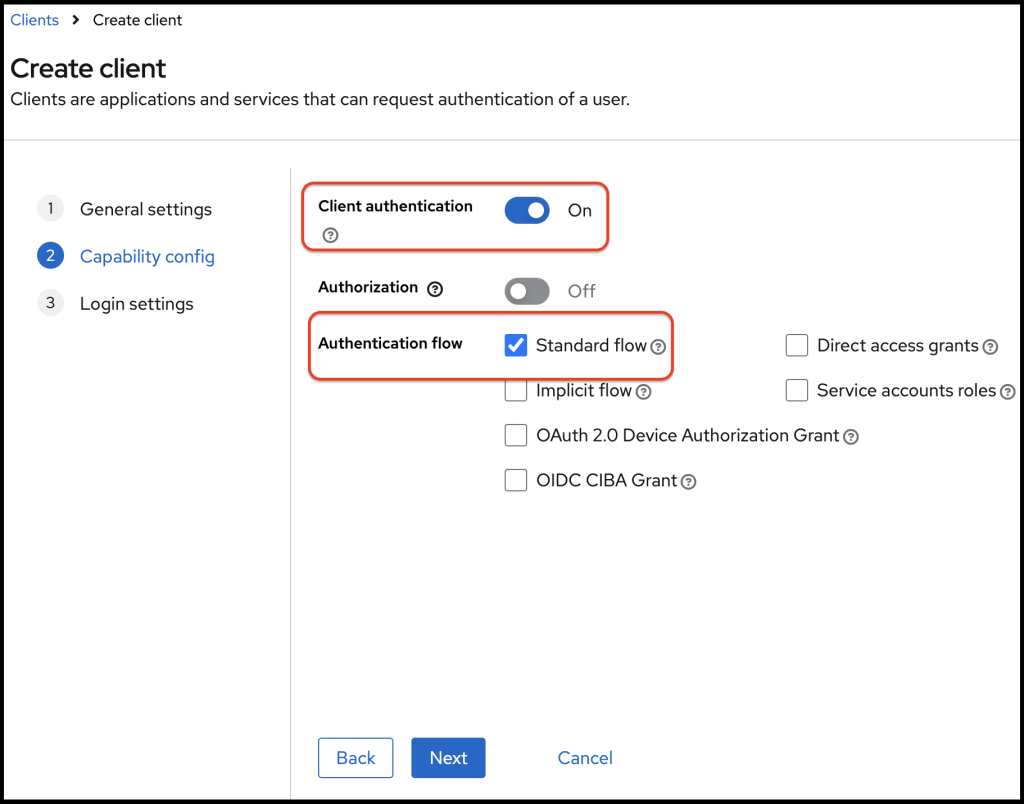
On the capability config form, I enable client authentication. Then client becomes a private client and client gets a secret value. Client has to use this secret when it has to retrieve the access token from the Identity provider (Keycloak in our case).
Also I keep the Standard flow enabled and disable the rest of the check boxes. Standard flow represents the Authorization Code grant type. Then click next.
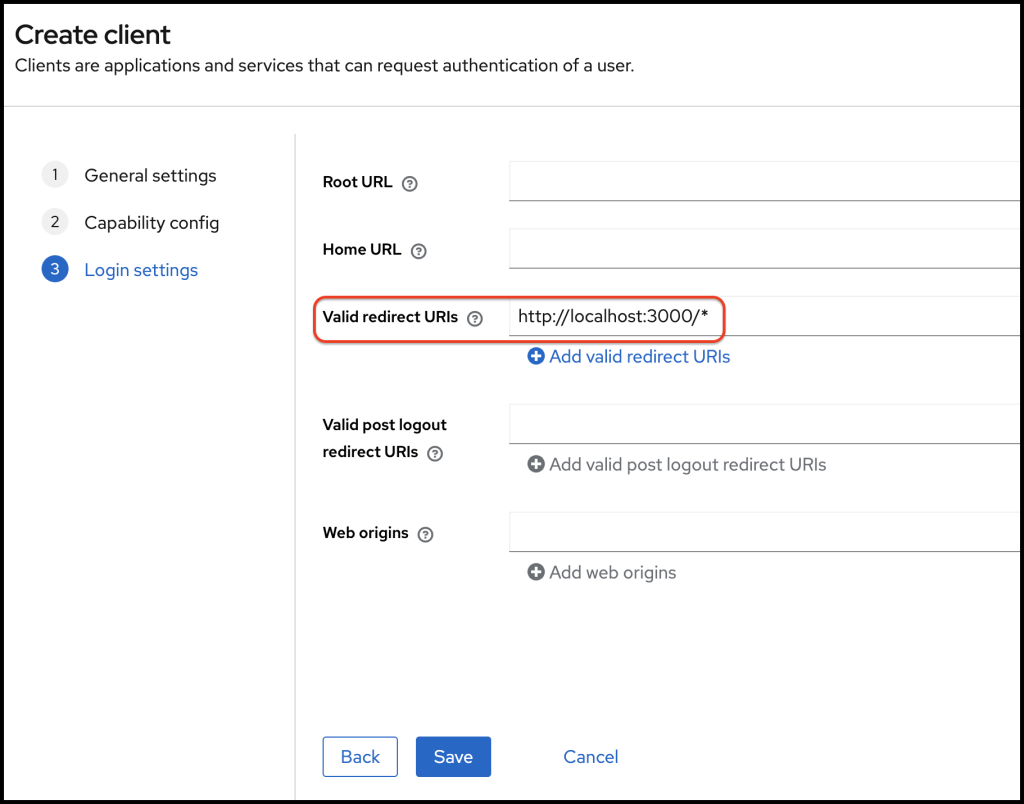
On the login settings form, I set a valid redirect URI. My ExpressJS application is running on http://localhost:3000 port. Therefore I set it as a valid redirect URI. Please note that I have added a wild card (*)
Therefore any url starting with http://localhost:3000 will be valid. Then click save.
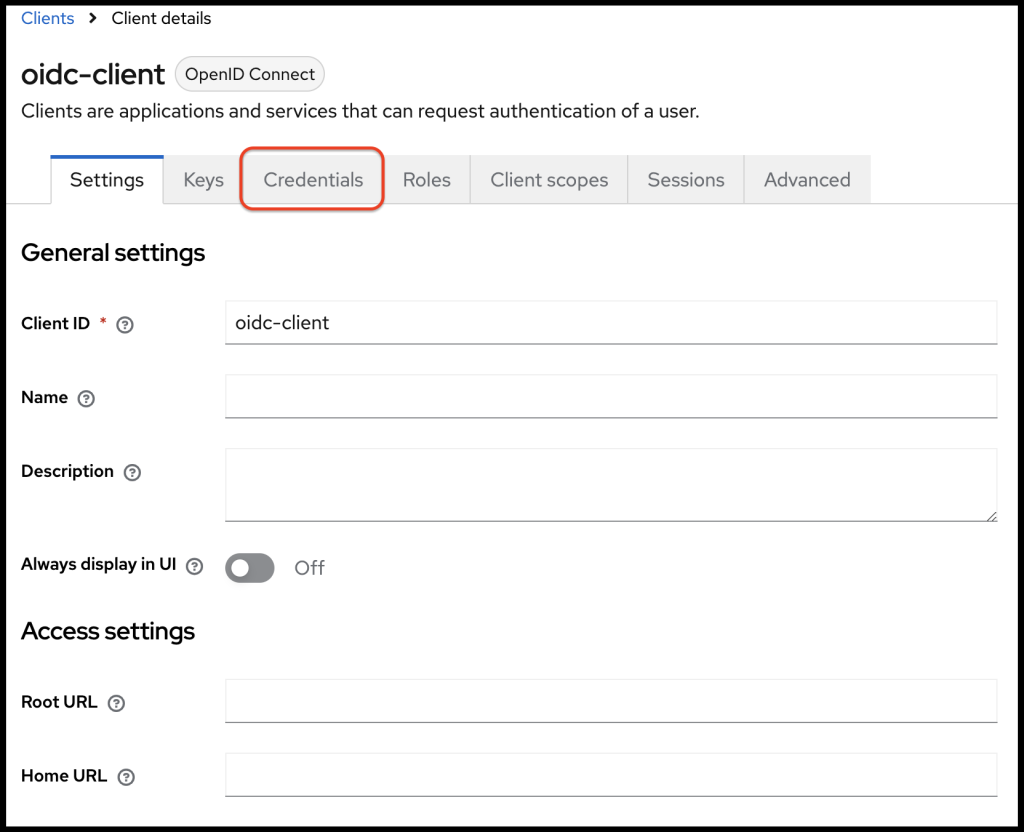
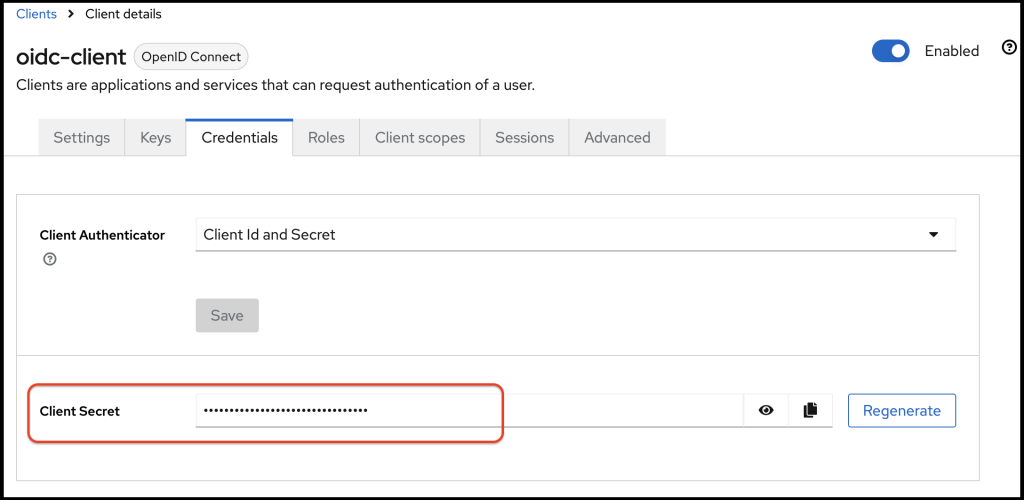
Once above configurations are saved, you will be redirected to the clients settings page. By visiting the credentials tab, you can see the client secret value.
We will have to use this client secret in a short while.
Keycloak user configuration
We just completed client configurations. I am going to create a user as well. For that I visit the users page.
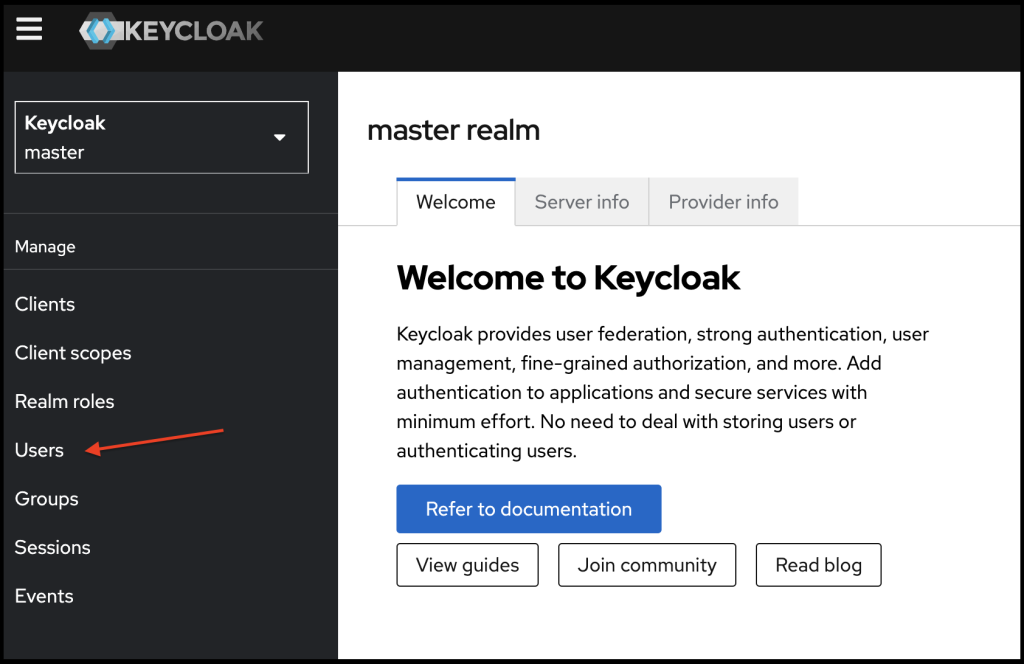
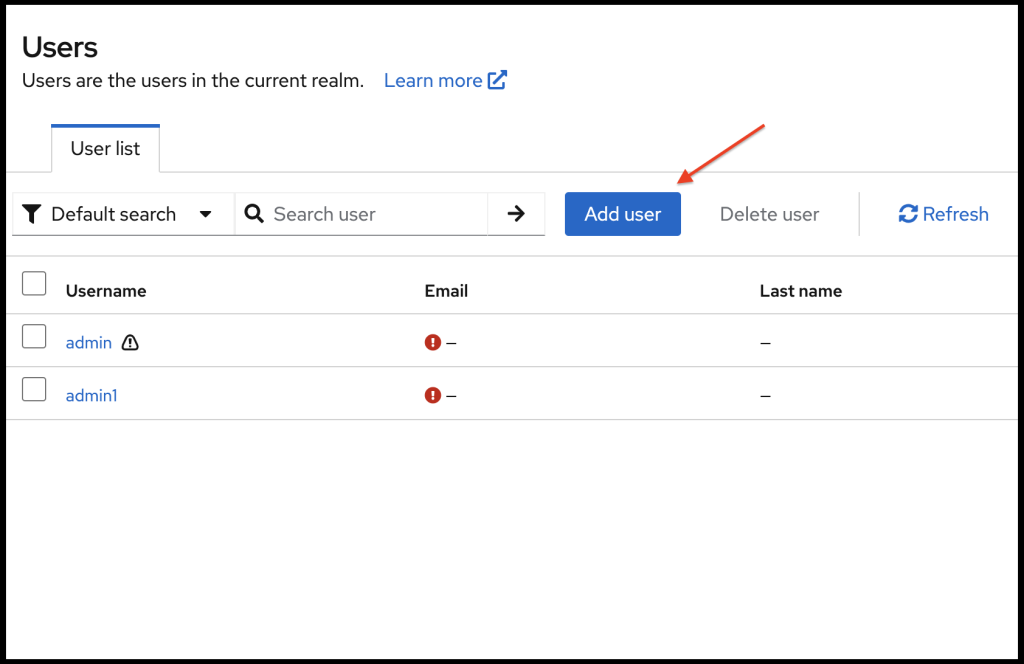
Where I click on add user.
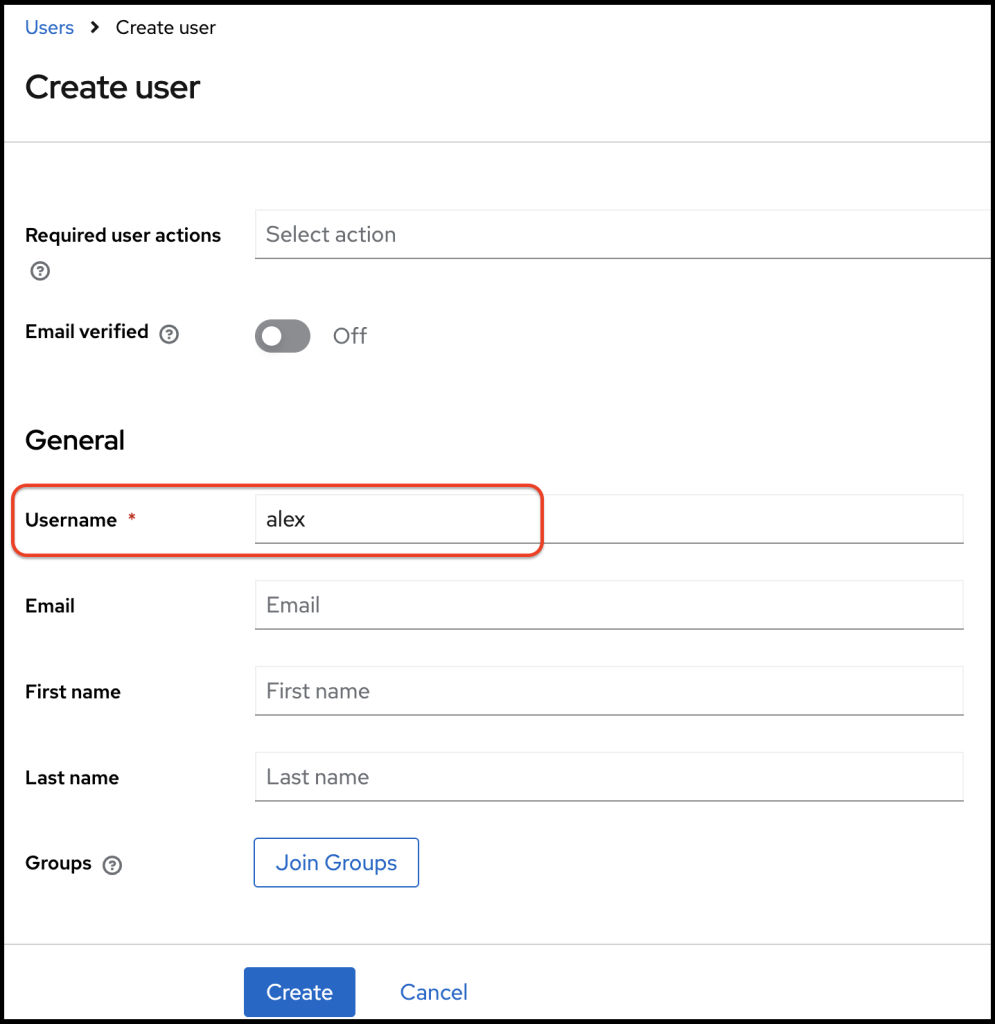
Provide a username (alex) and click create.
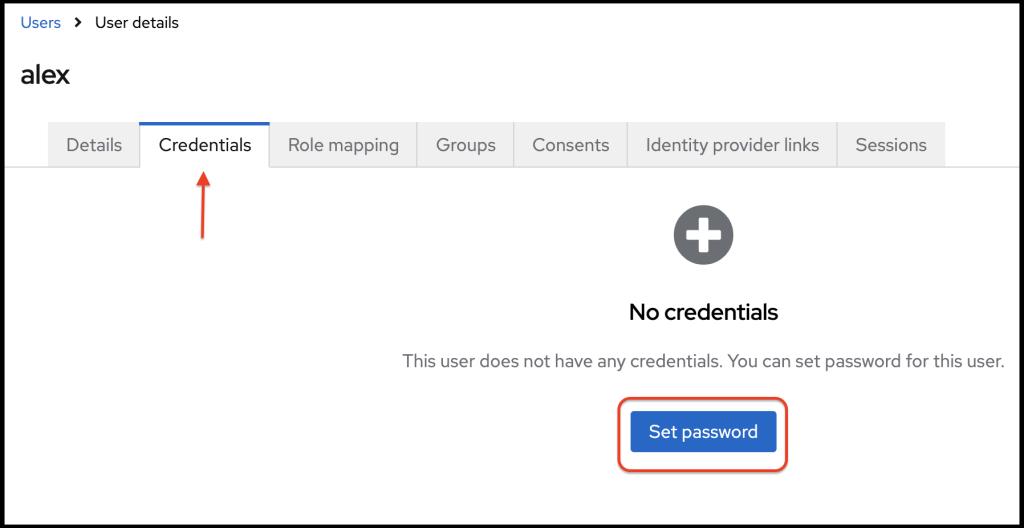
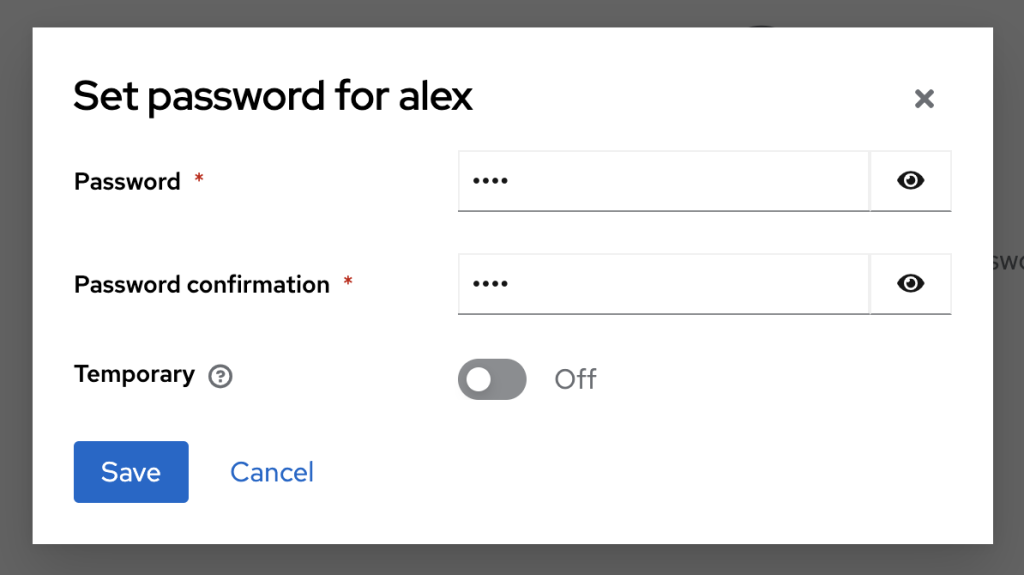
By visiting the credentials tab, I can set a password for the newly created user.
In the set password box, I set the password and click Save.
We just finished Keycloak level configurations. Let go through the simple ExpressJS application to understand the Authorization code flow.
ExpressJs Application
This is a very simple application composed of two files. just developed this for the purpose of understanding how Authorization code flow works.
Code is already hosted on Git Hub if you want to run the application.
Below I have explained every detail of the code so you can understand everything just by reading this post.
Files of the application
- express.js ( main file)
- package.json file
We need to add two dependencies for this program to run.
 // package.json file
 "dependencies": {
   "axios": "^1.7.7",  // HTTP client library
   "express": "^4.21.1" // ExpressJS framework
  }
Token endpoint and the authorization endpoint can be easily found using the .well-known configurations URL.
http://localhost:8080/realms/master/.well-known/openid-configuration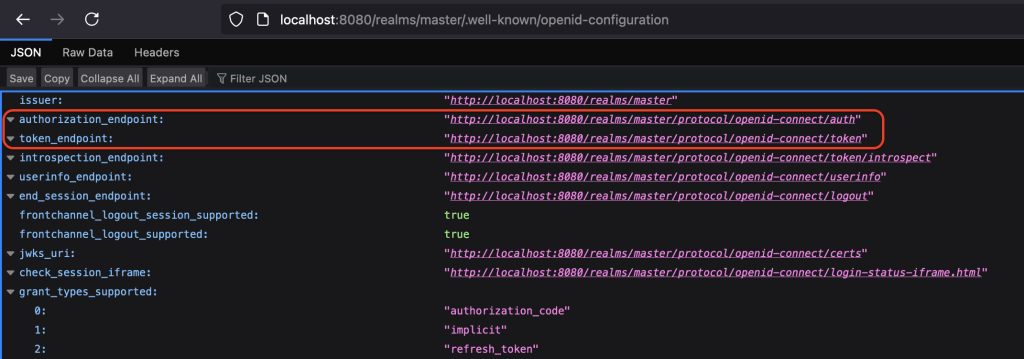
Lets go through the express.js file.
const express = require('express');
const axios = require('axios');
const app = express();

const config = {
    clientId: 'oidc-client',
    clientSecret: 'xxxxxxxxxxxx',
    realm: 'master',
    authServerUrl: 'http://localhost:8080',
    redirectUri: 'http://localhost:3000/callback'
};
for the config object I have provided the details of the keycloak server and the client we created above. I am not going to explain those fields since all of them are self explanatory.
Login endpoint
// Route to initiate login
app.get('/login', (req, res) => {
    const authUrl = `${config.authServerUrl}/realms/${config.realm}/protocol/openid-connect/auth` +
        `?client_id=${config.clientId}` +
        `&response_type=code` +
        `&redirect_uri=${encodeURIComponent(config.redirectUri)}` +
        `&scope=openid`;


    res.redirect(authUrl); // Redirect to Keycloak for login
});
Here you can see the /login endpoint. As I have explained above, it makes a request to the authorization endpoint of the Keycloak server.
Callback endpoint
// Callback route to handle Keycloak's redirect after authentication
app.get('/callback', async (req, res) => {
    const authCode = req.query.code;

    if (!authCode) {
        return res.status(400).send('Authorization code is missing');
    }

    try {
        // Exchange authorization code for tokens
        const tokenResponse = await axios.post(
            `${config.authServerUrl}/realms/${config.realm}/protocol/openid-connect/token`,
            new URLSearchParams({
                grant_type: 'authorization_code',
                client_id: config.clientId,
                client_secret: config.clientSecret,
                code: authCode,
                redirect_uri: config.redirectUri
            }),
            {
                headers: {
                    'Content-Type': 'application/x-www-form-urlencoded'
                }
            }
        );

        // Token response (contains access_token, refresh_token, etc.)
        res.json(tokenResponse.data);
    } catch (error) {
        console.error('Token exchange failed:', error);
        res.status(500).send('Token exchange failed');
    }
});
Once the user authentication is completed by the Keycloak server, user will be redirected to the /callback endpoint. Here you can see I have extracted the authorization code and make another request to the token URL to receive the tokens.
App is listening on port 3000
// Start the server
const PORT = 3000;
app.listen(PORT, () => {
    console.log(`Server running at http://localhost:${PORT}`);
});
5. Demonstration
Keycloak server is running on http://localhost:8080
Use below command to start the Express server
node express.jsExpress server started listening on the url http://localhost:3000
Once both keycloak and the ExpressJS server are up and running.
I type http://localhost:3000/login in my web browser.
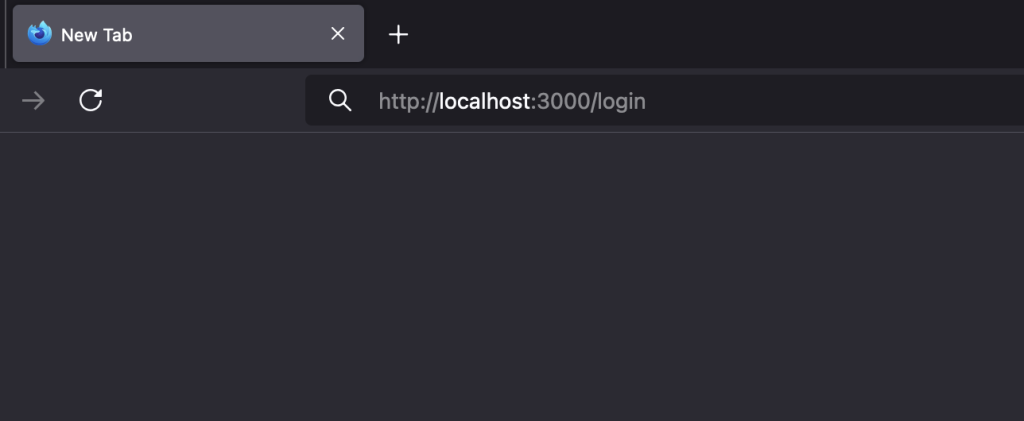
That redirected me to the keycloak login page.
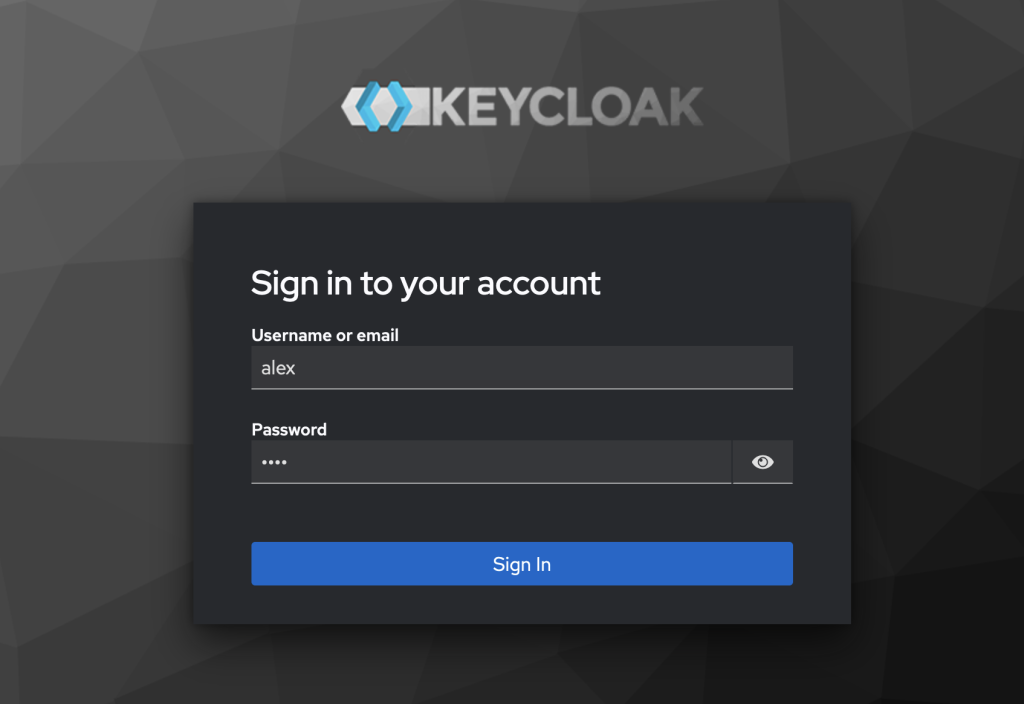
I provide the username and the password of the newly created user.
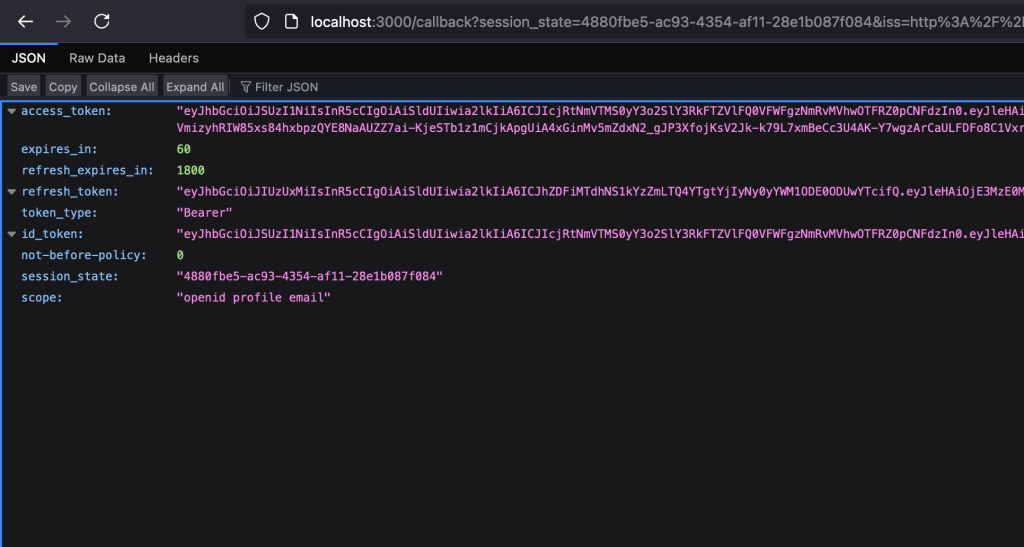
Once the authentication is successful, again I am redirected back to the /callback endpoint. Here it prints the complete response received from the token url.
I believe that you got a clear understanding about OpenID Connect Authorization code flow and how to use it with Keycloak.
Thank you . . .
References
https://github.com/hexadefence/authorization-code-flow
https://openid.net/specs/openid-connect-basic-1_0.html#RFC6749

Leave a Reply