How to Secure a Microservice Architecture Using Keycloak

Keycloak can be used to fully secure a Microservice system end to end. But most of the times, I have seen many developers does not have a proper knowledge on how to secure them properly.
The reason is that Microservices of a system have different roles to play. As an example: one Microservice might be catering user requests while other one (job Microservice) is processing user information to generate daily reports.
Based on the role they are playing, we need to apply the correct authentication or authorization mechanism. OpenID Connect provided multiple flows and OAuth 2.0 provided multiple grant types are used to cater these different kind of mechanisms.
Therefore, irrespective of the identity provider you are using, if it supports OpenID Connect & OAuth 2.0 protocols, you can use below mentioned methodologies to secure your microservices.
Simple Microservice Architecture
Let me take you through a very simple microservice architecture. Once identified each component of this design, we can decide how to secure them properly.
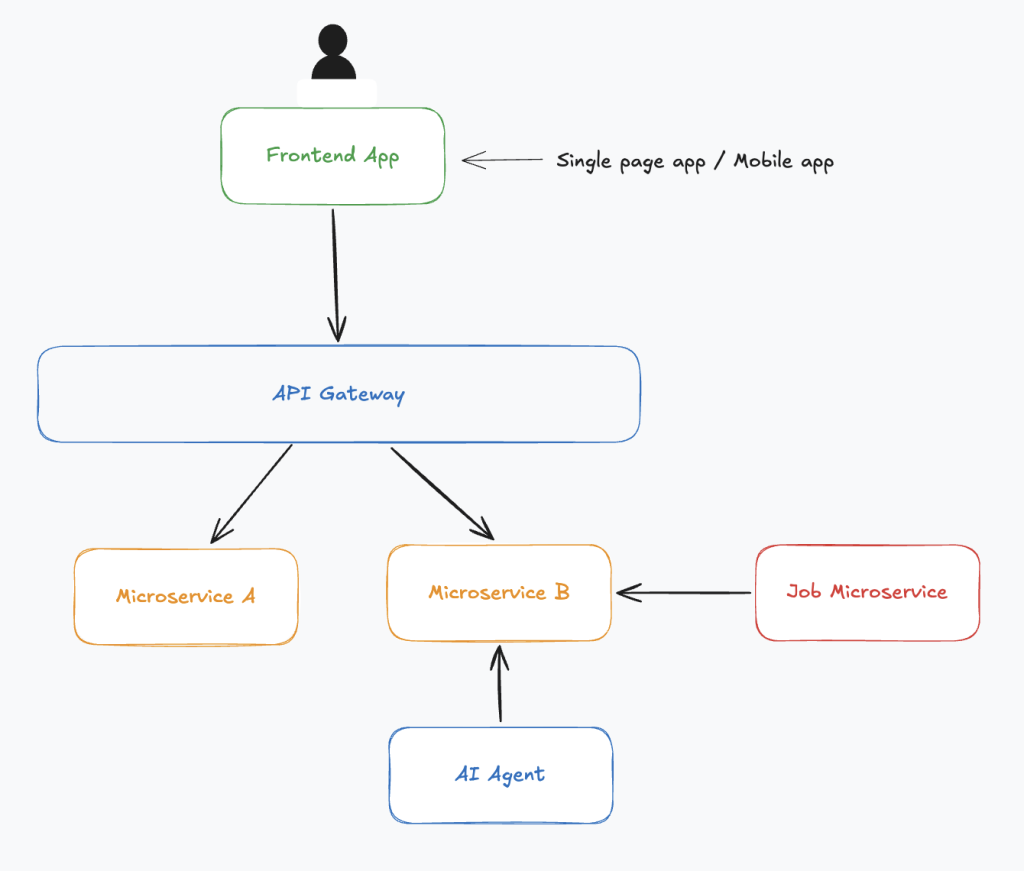
- User sits in front of the fronted application. Which can be a single page app like Angular/ React or a mobile application (Flutter, IOS, Android)
- Requests coming from the frontend application is routed to microservices by an API gateway.
- There exist two microservices (A & B) to serve frontend application requests.
- A job microservice is running and it connects to the microservice B periodically to fetch the available jobs to execute them.
- An AI Agent is running to gather the stats of the microservice B.
How to Secure this Architecture
According to the diagram, these are the places we need to add authentication and access control (authorization).
- Frontend application — should be accessible only for the authenticated users
- Requests coming from the fronted application to microservices — Only authenticated users should be able to send requests, othewise they should be ignored
- Job microservice to microservice B communication — Only the job microservice should be able to execute the exposed APIs by the microservice B. Calling those APIs should be forbidden to other microservices or external parties.
- AI agent to microservice B communication — Only the AI agent should be able to execute the exposed APIs by the microservice B. Calling those APIs should be forbidden to other microservices or external parties.
Basic Definition of authentication and authorization (access control) for you reference.
Authentication is the process of verifying who you are (proving your identity). Authorization is the process of verifying what you are allowed to do (granting access to specific resources or areas)
Let me take you through each scenario one by one
1. Securing the Frontend App
Requirement
- Frontend application should be accessible only for the authenticated users
- Backend microservices should respond to the fronted application’s HTTP requests, only if they are coming on behalf of an authenticated user.
To fulfill above requirements, frontend application can be directly connected with Keycloak via OpenID Connect protocol (OpenID Connect Authorization Code flow with PKCE).
Frontend application (web or mobile) is always running on the user’s device (On a web browser or mobile phone). Therefore it should be treated as a public client according to the OpenID Connect specification.
Public clients posses only a client_id and it does not have a client secret. Client secret is only provided for confidential (private) clients which are running on secure environments (eg: backend servers).
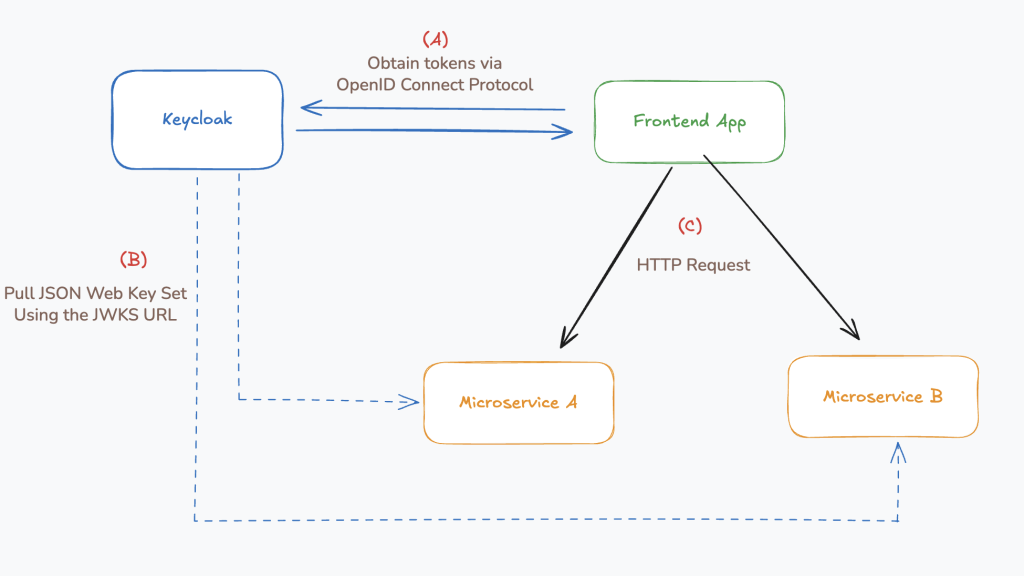
Step A of the Diagram: Once the frontend app is connected with Keycloak, users can directly authenticate against it. Once the authentication is successful, frontend application will receive an ID token and an access token from Keycloak.
ID token is used by the frontend application itself to get user information (first name, last name, email, etc) for the frontend application’s use.
Access token is used by the frontend application to call backend APIs (microservices). It will include the access token as a Bearer token in the Authorization http header for every backend request.
Access token verification at the backend
Microservices will extract the access token from the Authorization request header and verify whether the request is a valid one or not.
Token Verification process in Brief
An access token is a JSON web token and it has three parts as header, body, and the signature.

Keycloak generates this signature by using the asymmetric key encryption. Asymmetric encryption uses two keys (public key and private key). Private key is used to generate the signature and public key is used to validate the signature.
Private key is only available for Keycloak (Never shared with any other party) and the public key is shared with any party who needs to verify digital signatures generated by Keycloak.
Step B of the diagram: Keycloak has a special URL called JWKS URL which is exposed to public. Each microservice communicates with Keycloak via this JWKS URL to download public keys.
Once public keys are downloaded, whenever a request comes, downloaded public key is used to validate the signature.
Signature validation helps to identify who made the access token. In addition to that access token contains all the other attributes including roles which will helps microservices to decide what resources are allowed for this user to access and what operations (CRUD) are allowed to execute on them.
2. Microservices exist behind an API gateway.
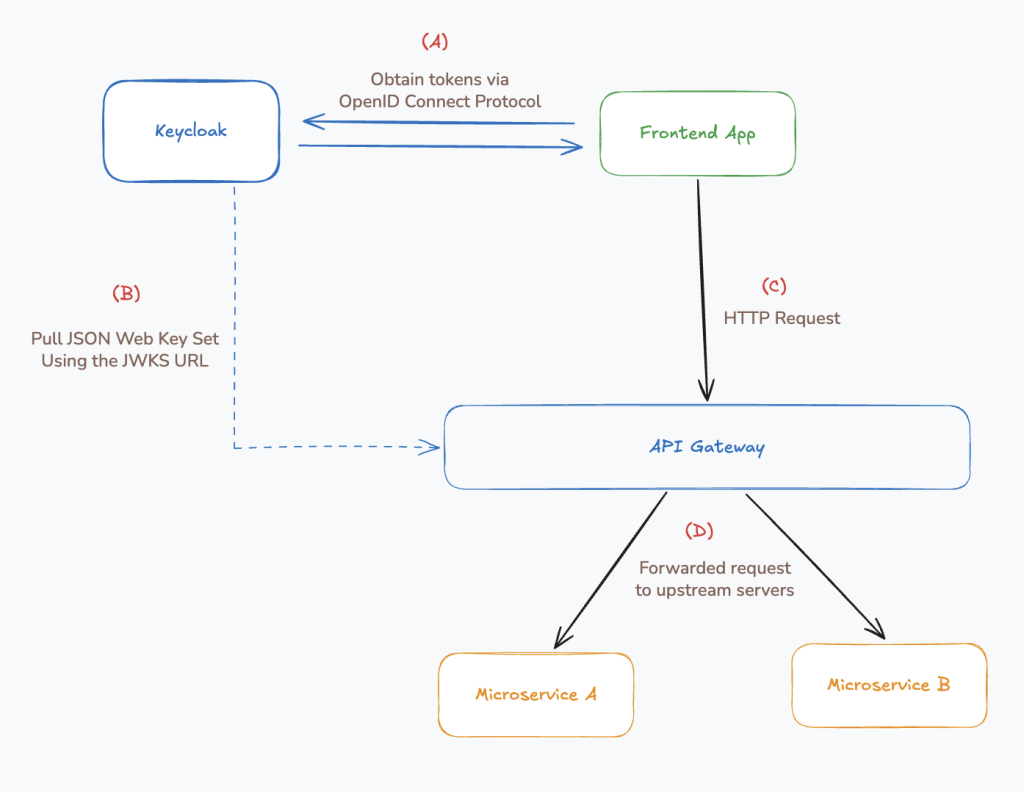
This is also mostly similar to the scenario we discussed above. In this architecture, most of the times API gateway does the token validation part by connecting with Keycloak.
Therefore microservices do not need to communicate with Keycloak for signature validation.
In this scenario, microservices blindly trust the requests coming from the API gateway as valid and already authenticated requests. Below conditions must be true for this environment to work securely.
- Microservices and the API Gateway should be in the same local network so nobody from outside can directly connect to the microservices.
- Microservices should allow inbound traffic only from the local IP of the API gateway.
3. Microservice to Microservice Communication
Below are few scenarios where microservice to microservice communication is required.
- A microservice needs to communicate with another microservice in order to respond to an incoming HTTP request
- An offline job microservice need to communicate with other microservices to complete a job or execute some workflows.
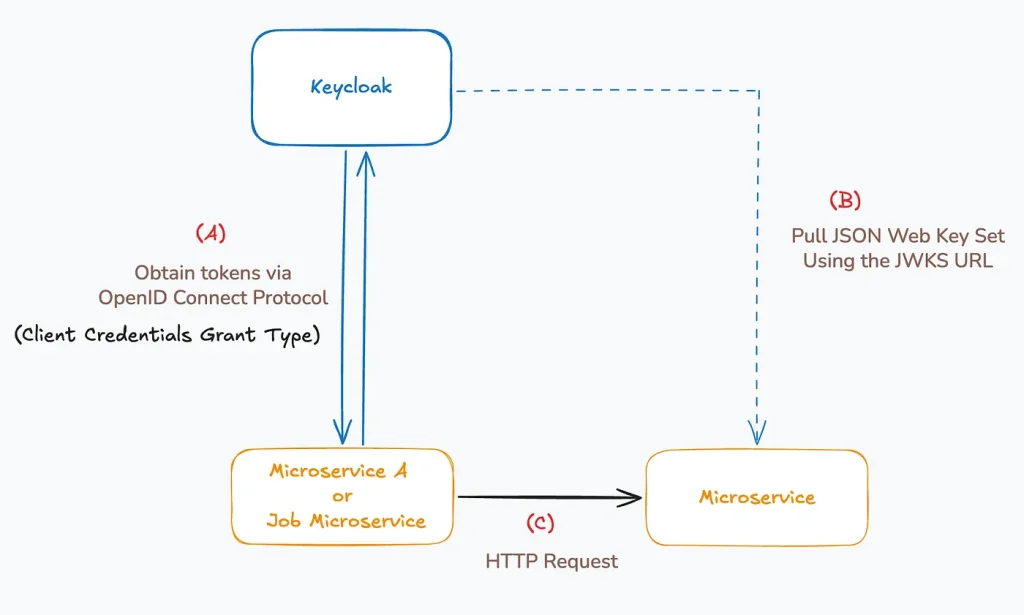
To secure this communication, there is an Oauth 2.0 dedicated grant type named Client credentials grant type. According to this method, each microservice has it’s own client_id and a client_secret (microservices are coosidered as private clients).
Microservices use these client and secret values to connect with Keycloak and generate tokens by themselves.
Requirement in the above illustrated use case
Microservice-A needs to communicate with the other microservice.
Microservice-A communicates with Keycloak to generate an access token. it passes client_id & client_secret in the HTTP request, Keycloak generates the token and sends it back in the response.
Microservice-A include that generated token in the HTTP request as a Bearer token (in the HTTP Authorization header).
Other microservice validates the token with support of the downloaded public keys. (We have already discussed about the public key usage to validate token signatures in an above section).
4. AI Agent to Microservice Communication
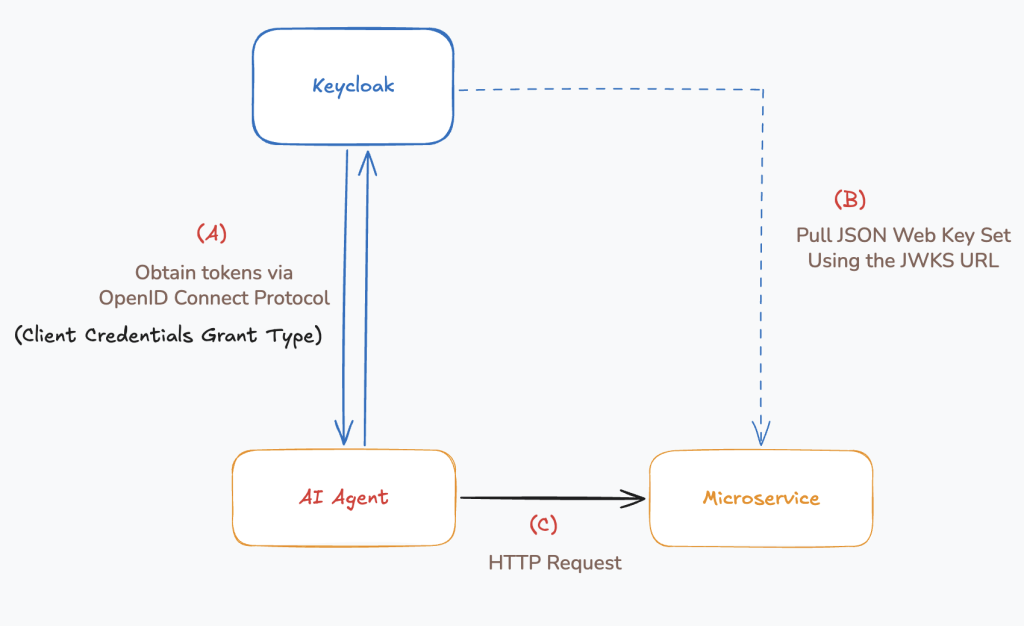
This flow is same as the microservice to microservice communication. Client credentials grant type is used. You can assume AI agent as another microservice in this flow.
This is what I wanted to explain you on this post. If you have any question please leave a comment.
Thank you !!!